WebGL Tutorial: Particle Effects via Billboards
Welcome back to another WebGL tutorial 🎉
This time around we’ll be learning to create particle effects by applying a technique called billboarding to a texture atlas of fire particles.
We’ll first explain the higher level concepts behind particle effects, and then we’ll step through a complete working example fire particle effect implementation.
You’ll hopefully walk away with an understanding of the core ideas behind particle effects and how to make use of them.
What is a particle effect?
In a nutshell, a particle effect is lots of smaller renderings that give you a desired look and feel when you put them all together.
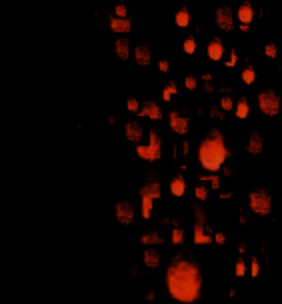
In the canvas below we illustrate a simple fire particle effect. In our example the “fire” is actually 1000 little squares with small pictures of fire on them. We move them in different directions and when it all comes together it looks like one larger fire.
Click and drag to move the camera
Try turning billboarding on and off by clicking on the button above the canvas. Move the camera around and pay attention to how things look when billboarding is on vs. when billboarding is off.
Seeing that happens when billboarding is off vs. on should illustrate why billboarding is so important!
How does it work?
Each particle is a square composed of two triangles. On top of each square we paint a texture that looks like fire.
If our camera happens to be directly facing our particle then everything works as we’d expect.
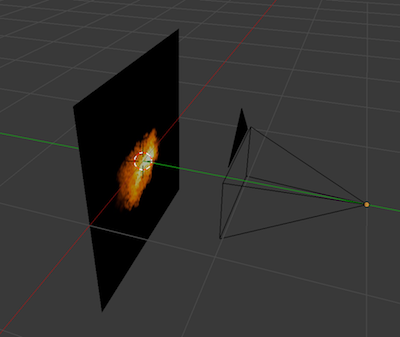 Our camera is directly facing our particle and can see it
But a problem occurs when our camera begins to move. All of a sudden our camera is pointed at the side of our square and we can no longer see the fire.
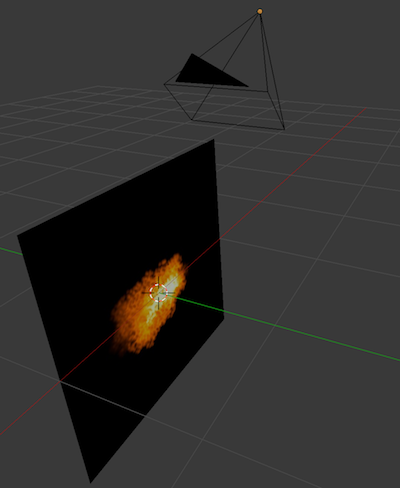 Our camera has moved and it can’t see our particle
To resolve this, we’ll make our vertex shader move the four corners of our particle squares so that they’re always aligned with our camera.
We do this by getting the up and right vector for our now tilted camera and using them to place the four corners of our particle along the same plane as our tilted camera.
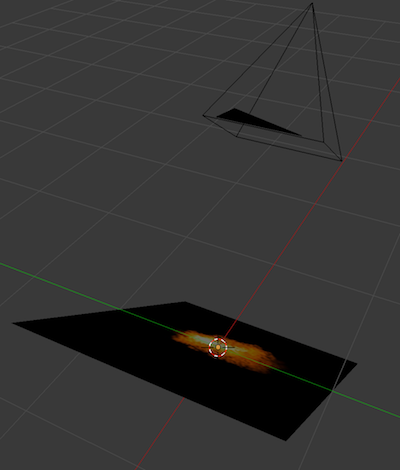 We move the particle’s corners to face the camera
Getting set up
Before we start coding we’ll set up our directory.
In your command line run the following:
mkdir webgl-particle-tutorial
cd webgl-particle-tutorial
touch tutorial.js
Next we install a couple of JavaScript modules.
gl-mat4 will help us with our matrix math.
We’ll use budo as a development server to view our work locally when we’re finished.
npm install gl-mat4@1.1.4 budo@10.0.4
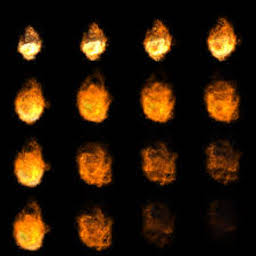
Lastly we’ll download the texture atlas that we’ll use for our particle effect. Throughout the lifetime of a particle it will change from the first fire image to the 12th one.
curl -OL https://github.com/chinedufn/\
webgl-particle-effect-tutorial/raw/master/\
fire-texture-atlas.jpg > fire-texture-atlas.jpg
The fire texture atlas looks like this:
Alright now that you have all of your dependencies you will no longer need an internet connection for the rest of the tutorial.
Now that we’re all set up let’s write some shaders!
Let’s start coding!
Open your tutorial.js file. We’ll add code to it block by block, explaining it as we go.
You’ll likely learn the most if you type it out, but for convenience you can find the commented fire particle effect tutorial source code on GitHub.
var glMat4 = require('gl-mat4')

var billboardingEnabled = true

var canvas = document.createElement('canvas')
canvas.width = 500
canvas.height = 500
var mountLocation = document.getElementById(
  'webgl-particle-effect-tutorial'
) || document.body
First up we start by pulling in our gl-mat4 dependency that we’ll later use to position our camera. We then create the canvas that we’ll be drawing our particle effect onto.
var billboardButton = document.createElement('button')
billboardButton.innerHTML = 'Click to disable billboarding'
billboardButton.style.display = 'block'
billboardButton.style.cursor = 'pointer'
billboardButton.style.marginBottom = '3px'
billboardButton.style.height = '40px'
billboardButton.style.width = '160px'
billboardButton.onclick = function () {
  billboardingEnabled = !billboardingEnabled
  billboardButton.innerHTML = (
    billboardingEnabled ?
      'Click to disable billboarding' :
      'Click to enable billboarding'
  )
}
Next we start creating the controls that power our little demo. Here we make the button that you can click to turn billboarding on and off. Seeing what happens when billboarding is turned off gives us a better idea of why it’s so useful to have.
mountLocation.appendChild(billboardButton)
mountLocation.appendChild(canvas)
Now that we have our button and canvas we insert them into the page.
var isDragging = false

var xRotation = 0
var yRotation = 0

var lastMouseX = 0
var lastMouseY = 0

canvas.onmousedown = function (e) {
  isDragging = true
  lastMouseX = e.pageX
  lastMouseY = e.pageY
}
canvas.onmousemove = function (e) {
  if (isDragging) {
    xRotation += (e.pageY - lastMouseY) / 50
    yRotation -= (e.pageX - lastMouseX) / 50

    xRotation = Math.min(xRotation, Math.PI / 2.5)
    xRotation = Math.max(xRotation, -Math.PI / 2.5)

    lastMouseX = e.pageX
    lastMouseY = e.pageY
  }
}
canvas.onmouseup = function (e) {
  isDragging = false
}

canvas.addEventListener('touchstart', function (e) {
  lastMouseX = e.touches[0].clientX
  lastMouseY = e.touches[0].clientY
})
canvas.addEventListener('touchmove', function (e) {
  e.preventDefault()
  xRotation += (e.touches[0].clientY - lastMouseY) / 50
  yRotation -= (e.touches[0].clientX - lastMouseX) / 50

  xRotation = Math.min(xRotation, Math.PI / 2.5)
  xRotation = Math.max(xRotation, -Math.PI / 2.5)

  lastMouseX = e.touches[0].clientX
  lastMouseY = e.touches[0].clientY
})
We want to be able to click and drag our canvas to move our camera, so we listen for onmousedown onmousemove and onmouseup to update our camera’s rotation about the world’s X and Y axes as we drag.
Similarly, we listen for touch events on the camera in order to move the camera as you drag your finger on a mobile device.
var gl = canvas.getContext('webgl')
gl.clearColor(0.0, 0.0, 0.0, 1.0)
gl.viewport(0, 0, 500, 500)
var vertexGLSL = `
uniform float uTime;

uniform vec3 uFirePos;

attribute float aLifetime;

attribute vec2 aTextureCoords;

attribute vec2 aTriCorner;

attribute vec3 aCenterOffset;

attribute vec3 aVelocity;

uniform mat4 uPMatrix;
uniform mat4 uViewMatrix;

uniform bool uUseBillboarding;

varying float vLifetime;
varying vec2 vTextureCoords;

void main (void) {
  float time = mod(uTime, aLifetime);

  vec4 position = vec4(
    uFirePos + aCenterOffset + (time * aVelocity),
    1.0
  );

  vLifetime = 1.3 - (time / aLifetime);
  vLifetime = clamp(vLifetime, 0.0, 1.0);
  float size = (vLifetime * vLifetime) * 0.05;

  if (uUseBillboarding) {
    vec3 cameraRight = vec3(
      uViewMatrix[0].x, uViewMatrix[1].x, uViewMatrix[2].x
    );
    vec3 cameraUp = vec3(
      uViewMatrix[0].y, uViewMatrix[1].y, uViewMatrix[2].y
    );

    position.xyz += (cameraRight * aTriCorner.x * size) +
     (cameraUp * aTriCorner.y * size);
  } else {
    position.xy += aTriCorner.xy * size;
  }

  gl_Position = uPMatrix * uViewMatrix * position;

  vTextureCoords = aTextureCoords;
  vLifetime = aLifetime;
}
`
Our vertex shader is the meat of our particle effect implementation.
We start by taking our current clock time modulus the lifetime of the particle. This makes our particles restart from the beginning of their motion whenever their life expires.
We then position our particle at the location of our fire, plus the offset from this fire location, plus the velocity of the particle times the amount of time that has elapsed in it’s lifetime simulation.
vLifetime is a number between 1 and 0 that decreases as the particle ages. We use it to size our particle proportionally to its age. It starts off large but then shrinks as it ages.
After that, if billboarding is turned on, we get the camera’s up and right direction in world space. Since we know the up and right direction of the camera we know the plane that the camera is facing. We use the billboards center position, the size of the billboard and the camera’s up and right vectors in order to position the current vertex along the plane that the camera is facing.
var fragmentGLSL = `
precision mediump float;

uniform vec4 uColor;

uniform float uTimeFrag;

varying float vLifetime;
varying vec2 vTextureCoords;

uniform sampler2D fireAtlas;

void main (void) {
  float time = mod(uTimeFrag, vLifetime);
  float percentOfLife = time / vLifetime;
  percentOfLife = clamp(percentOfLife, 0.0, 1.0);

  float offset = floor(16.0 * percentOfLife);
  float offsetX = floor(mod(offset, 4.0)) / 4.0;
  float offsetY = 0.75 - floor(offset / 4.0) / 4.0;

  vec4 texColor = texture2D(
    fireAtlas,
    vec2(
      (vTextureCoords.x / 4.0) + offsetX,
      (vTextureCoords.y / 4.0) + offsetY
  ));
  gl_FragColor = uColor * texColor;

  gl_FragColor.a *= vLifetime;
}
`
As we simulate our particle our fragment shader calculates a number between 0 and 1 called percentOfLife. Based on the percentage of the particle’s life that has elapsed we choose one of the 16 textures in the texture atlas that we downloaded earlier.
Lastly we multiply gl_FragColor.a *= vLifetime;. This means that as vLifetime decreases the fragment fades away.
var vertexShader = gl.createShader(gl.VERTEX_SHADER)
gl.shaderSource(vertexShader, vertexGLSL)
gl.compileShader(vertexShader)

var fragmentShader = gl.createShader(gl.FRAGMENT_SHADER)
gl.shaderSource(fragmentShader, fragmentGLSL)
gl.compileShader(fragmentShader)

var shaderProgram = gl.createProgram()
gl.attachShader(shaderProgram, vertexShader)
gl.attachShader(shaderProgram, fragmentShader)
gl.linkProgram(shaderProgram)
gl.useProgram(shaderProgram)
In the usual boilerplate fashion here we compile the vertex and fragment shaders that we defined above.
var lifetimeAttrib = gl.getAttribLocation(
  shaderProgram, 'aLifetime'
)
var texCoordAttrib = gl.getAttribLocation(
  shaderProgram, 'aTextureCoords'
)
var triCornerAttrib = gl.getAttribLocation(
  shaderProgram, 'aTriCorner'
)
var centerOffsetAttrib = gl.getAttribLocation(
  shaderProgram, 'aCenterOffset'
)
var velocityAttrib = gl.getAttribLocation(
  shaderProgram, 'aVelocity'
)
gl.enableVertexAttribArray(lifetimeAttrib)
gl.enableVertexAttribArray(texCoordAttrib)
gl.enableVertexAttribArray(triCornerAttrib)
gl.enableVertexAttribArray(centerOffsetAttrib)
gl.enableVertexAttribArray(velocityAttrib)
And then we enable all of our vertex attributes.
var timeUni = gl.getUniformLocation(shaderProgram, 'uTime')
var timeUniFrag = gl.getUniformLocation(shaderProgram, 'uTimeFrag')
var firePosUni = gl.getUniformLocation(shaderProgram, 'uFirePos')
var perspectiveUni = gl.getUniformLocation(shaderProgram, 'uPMatrix')
var viewUni = gl.getUniformLocation(shaderProgram, 'uViewMatrix')
var colorUni = gl.getUniformLocation(shaderProgram, 'uColor')
var fireAtlasUni = gl.getUniformLocation(shaderProgram, 'uFireAtlas')
var useBillboardUni = gl.getUniformLocation(
  shaderProgram, 'uUseBillboarding'
)
Followed by getting the location of all of our uniforms so that we can later pass uniform data to the GPU.
var imageIsLoaded = false
var fireTexture = gl.createTexture()
var fireAtlas = new window.Image()
fireAtlas.onload = function () {
  gl.pixelStorei(gl.UNPACK_FLIP_Y_WEBGL, true)
  gl.bindTexture(gl.TEXTURE_2D, fireTexture)
  gl.texImage2D(
    gl.TEXTURE_2D, 0, gl.RGBA, gl.RGBA, gl.UNSIGNED_BYTE, fireAtlas
  )
  gl.texParameteri(gl.TEXTURE_2D, gl.TEXTURE_MAG_FILTER, gl.LINEAR)
  gl.texParameteri(gl.TEXTURE_2D, gl.TEXTURE_MIN_FILTER, gl.LINEAR)
  imageIsLoaded = true
}
fireAtlas.src = 'fire-texture-atlas.jpg'
In order to render our particles we need to have a texture. We load up our fire texture atlas and then create a WebGLTexture using the atlas.
var numParticles = 1000
var lifetimes = []
var triCorners = []
var texCoords = []
var vertexIndices = []
var centerOffsets = []
var velocities = []

var triCornersCycle = [
  -1.0, -1.0,
  1.0, -1.0,
  1.0, 1.0,
  -1.0, 1.0
]
var texCoordsCycle = [
  0, 0,
  1, 0,
  1, 1,
  0, 1
]

for (var i = 0; i < numParticles; i++) {
  var lifetime = 8 * Math.random()

  var diameterAroundCenter = 0.5
  var halfDiameterAroundCenter = diameterAroundCenter / 2

  var xStartOffset = diameterAroundCenter *
    Math.random() - halfDiameterAroundCenter
  xStartOffset /= 3

  var yStartOffset = diameterAroundCenter *
    Math.random() - halfDiameterAroundCenter
  yStartOffset /= 10

  var zStartOffset = diameterAroundCenter *
    Math.random() - halfDiameterAroundCenter
  zStartOffset /= 3

  var upVelocity = 0.1 * Math.random()

  var xSideVelocity = 0.02 * Math.random()
  if (xStartOffset > 0) {
    xSideVelocity *= -1
  }

  var zSideVelocity = 0.02 * Math.random()
  if (zStartOffset > 0) {
    zSideVelocity *= -1
  }

  for (var j = 0; j < 4; j++) {
    lifetimes.push(lifetime)

    triCorners.push(triCornersCycle[j * 2])
    triCorners.push(triCornersCycle[j * 2 + 1])

    texCoords.push(texCoordsCycle[j * 2])
    texCoords.push(texCoordsCycle[j * 2 + 1])

    centerOffsets.push(xStartOffset)
    centerOffsets.push(yStartOffset + Math.abs(xStartOffset / 2.0))
    centerOffsets.push(zStartOffset)

    velocities.push(xSideVelocity)
    velocities.push(upVelocity)
    velocities.push(zSideVelocity)
  }

  vertexIndices = vertexIndices.concat([
    0, 1, 2, 0, 2, 3
  ].map(function (num) { return num + 4 * i }))
}
We create all of our particles and randomly choose how each one will move, where it will begin its life and how long it will live.
Each particle’s four corners are positioned identically relative to the particle’s center. So triCornersCycle gets re-used by every particle in order to position it’s four corners around it’s center.
function createBuffer (bufferType, DataType, data) {
  var buffer = gl.createBuffer()
  gl.bindBuffer(gl[bufferType], buffer)
  gl.bufferData(gl[bufferType], new DataType(data), gl.STATIC_DRAW)
  return buffer
}
createBuffer('ARRAY_BUFFER', Float32Array, lifetimes)
gl.vertexAttribPointer(lifetimeAttrib, 1, gl.FLOAT, false, 0, 0)

createBuffer('ARRAY_BUFFER', Float32Array, texCoords)
gl.vertexAttribPointer(texCoordAttrib, 2, gl.FLOAT, false, 0, 0)

createBuffer('ARRAY_BUFFER', Float32Array, triCorners)
gl.vertexAttribPointer(triCornerAttrib, 2, gl.FLOAT, false, 0, 0)

createBuffer('ARRAY_BUFFER', Float32Array, centerOffsets)
gl.vertexAttribPointer(centerOffsetAttrib, 3, gl.FLOAT, false, 0, 0)

createBuffer('ARRAY_BUFFER', Float32Array, velocities)
gl.vertexAttribPointer(velocityAttrib, 3, gl.FLOAT, false, 0, 0)

createBuffer('ELEMENT_ARRAY_BUFFER', Uint16Array, vertexIndices)

gl.enable(gl.BLEND)
gl.blendFunc(gl.ONE, gl.ONE)

gl.activeTexture(gl.TEXTURE0)
gl.bindTexture(gl.TEXTURE_2D, fireTexture)
gl.uniform1i(fireAtlasUni, 0)

gl.uniformMatrix4fv(
  perspectiveUni,
  false,
  glMat4.perspective([], Math.PI / 3, 1, 0.01, 1000)
)
First we push all of our particle attribute data to the GPU so that we can later draw our particles.
The important piece here is that we set gl.enable(gl.BLEND) and gl.blendFunc(gl.ONE, gl.ONE).
If you remember how the texture atlas looks, each fire particle square is some red in the center surrounded by black.
We want the red to show up as we render our particle effect, but we don’t want any of the black background. If we had rendered the black background it would overlap the particle squads behind it and we’d see something like this:
 Improper blending
There are many, many ways to handle blending. Here we’re more or less saying:
(Update June 5, 2020) The blending explanation directly below this update is misguided. If you look at the demo above you will see that the center of the flame is white.
That is because those particles are being added with the other densely packed particles at the center of the flame behind them, leading to large color channel values that the GPU clamps back down to rgb(255, 255, 255).
A potentially better strategy (depending on what you’re aiming for) could be to discard fragments with
color.a == 0in the fragment shader.
Add our particle’s color with the color of whatever is behind it. So… If our particle color is black…
(0, 0, 0)+whatever is behind it=whatever is behind it. So all black parts of our texture atlas are effectively transparent.
function createCamera () {
  var camera = glMat4.create()

  glMat4.translate(camera, camera, [0, 0.25, 1])

  var xAxisRotation = glMat4.create()
  var yAxisRotation = glMat4.create()
  glMat4.rotateX(xAxisRotation, xAxisRotation, -xRotation)
  glMat4.rotateY(yAxisRotation, yAxisRotation, yRotation)
  glMat4.multiply(camera, xAxisRotation, camera)
  glMat4.multiply(camera, yAxisRotation, camera)

  var cameraPos = [camera[12], camera[13], camera[14]]
  glMat4.lookAt(camera, cameraPos, redFirePos, [0, 1, 0])

  return camera
}
Next we create our view matrix so that we can render everything relative to our camera that we control by dragging our canvas.
var previousTime = new Date().getTime()

var clockTime = 3

var redFirePos = [0.0, 0.0, 0.0]
var redFireColor = [0.8, 0.25, 0.25, 1.0]

var purpFirePos = [0.5, 0.0, 0.0]
var purpFireColor = [0.25, 0.25, 8.25, 1.0]

function draw () {
  if (imageIsLoaded) {
    gl.clear(gl.COLOR_BUFFER_BIT | gl.DEPTH_BUFFER_BIT)

    var currentTime = new Date().getTime()
    clockTime += (currentTime - previousTime) / 1000
    previousTime = currentTime

    gl.uniform1f(timeUni, clockTime)
    gl.uniform1f(timeUniFrag, clockTime)

    gl.uniformMatrix4fv(viewUni, false, createCamera())

    gl.uniform1i(useBillboardUni, billboardingEnabled)

    gl.uniform3fv(firePosUni, redFirePos)
    gl.uniform4fv(colorUni, redFireColor)

    gl.drawElements(gl.TRIANGLES, numParticles * 6, gl.UNSIGNED_SHORT, 0)

    gl.uniform3fv(firePosUni, purpFirePos)
    gl.uniform4fv(colorUni, purpFireColor)

    gl.drawElements(gl.TRIANGLES, numParticles * 6, gl.UNSIGNED_SHORT, 0)
  }

  window.requestAnimationFrame(draw)
}
draw()
In our final function we increment our simulation time every frame and pass that time into our vertex and fragment shader. Then we draw our red flame and our purple flame.
You made it! Now you can run ./node_modules/budo/bin/cmd.js tutorial.js --open --live and you should see your particle effect in your browser!
Great work!
You made it to the bottom. Pat yourself on the back.
What would you like to learn next? Let me know on Twitter :)
Til’ next time,
- CFN